Thursday, May 23, 2013

Summer is coming!

I had to chuckle that I hadn't realized how close we are to the end of the school year.  It wasn't until an old co-worker posted on FB that there were only 9 days left of school that it dawned on me that in just a few days I will have all three kids, each three years apart, at home again with me again all day for 3 months!  Holy buckets do I need to get some things planned out or we will all lose our minds!  Ha!

I'm so excited to go through the full summer here at our house.  Last year was so wild and crazy with us moving from our old house on the very last day of the school year and living out of a suitcase for the next 7 weeks until we moved here.  It's hard to believe that we are so close to being here for one full year.

Anyway, back to the three little people that I need to keep entertained for 3 months.  I'm so looking forward to not watching the clock and to have those wonderful, lazy summer mornings with the kids....but I know that I need to have some activities mapped out throughout the summer.  Here is my list of things so far -- some of these are annual events, some we have done once or twice and some are totally new.  I'd love to hear your thoughts and things you think I should add to the list.

  • visit all the parks in our city - one or two parks a week and picnic lunch
  • swimming beach
  • make a tic tac toe board on a stump and paint rocks for play pieces
  • visit the zoo and zoo farm
  • geocaching
  • Caponi Art Park
  • Sculpture Garden and Sebastian Joe's IceCream
  • Fort Snelling....I don't think I've ever been there
  • Art Museum
  • Minnehaha Falls
  • Arboretum
  • Shoots and Ladders Park
  • Playdates with friends from old hood
  • Hiking trails
  • Weekend camping trips
  • Visit to Island G&G
  • Cabin
  • Mini golf/go carts
  • water park
  • camp in backyard
  • set up swimming pool / sprinklers
  • make a water station using pvc pipes
  • ride bikes to local farmer's market (tuesdays)
  • Moms group outings
  • visit the other libraries in the county
  • swimming lesson camp
  • golf with E
  • see a movie
  • go to a drive in or local movie in the park
  • kids participate in a service project
  • Explore local bike paths
And that's what I've come up with so far.  Let me know if you have other ideas that would be fun for an 8, 5 and 2 year old.

Thursday, May 9, 2013

Porch Make-Over

The porch is my favorite room in the house.  When we originally looked at the house we fell in love with the kitchen and it's big window (is it weird to have a favorite window???).  Seconds later I fell even more in love as my eyes moved out to the porch.  The windows, privacy, relaxed feel....it's a great room.  We bought the wicker set from the previous owners, but dark green really isn't my favorite color, in fact it's probably my least favorite color (sorry people who love green) so I had pictured something different from the start.  Blues, yellows, oranges...something like that.  So, this is how the porch went from this:
....to this!
I recovered the seats in the Trellis Blue.  Bought some new pillow forms and made all new pillow cases. Got a new floral rug (just barely seen on right) that goes out to deck. The woven table cloth was a gift to me years ago from a good friend and was part of the color plan....as was the pot on that 3 legged stool.  That pot was also a gift to me years ago as I had hoped to someday have a blue and yellow room.  I plan to paint that little 3-legged stool and also that square, brown table in the corner.  It's pretty scratched up on the top and a coral or even lime green could be fun.  A new lamp is also in the works for that corner...something a little more porchey....that's a word....right???  Haha!
This back wall was also painted as it had been the dark, forest green to match the stripes.  It's the same blue paint in Nikkel's room...had a bit left over and figured we may as well use what we have!  Sconces were added on each side of that window.    The black little table there had been in the living room housing our tv....but I think it works okay out there.  This wall needs something yet...art, porchey type things.  I have some floating shelves that could be staggered here...just not sure yet.
Here's a close-up of the fabrics.  I fell in love with the birds and flowers.  We are really loving our backyard and learning about all the birds...so it just seemed perfect for the room.
 As far as sewing the cushions, I just kind of winged it and traced the shape of the cushion and went for it.  The only thing I wish I had done was make it just a bit tighter.  I went with the measurements of the seat and really I should have gone down in a inch....I can always go and take it in....but we'll see how much it really bugs me over time....sewing that large cushion closed was a bit of a challenge.  The pillows....the two long ones on the back are envelope style pillows and the red ones have zippers.  Zippers can be tricky, but I got it down pretty well by sixth pillow ;-) So, overall, I'm really pleased with how it all turned out.  
If you're ever in the neighborhood, please stop over and join us on the porch for a cup of tea or a G&T! 

Monday, May 6, 2013

Big Boy Bed

Any guesses who that boy is in the big boy bed???
 It's Nikkels!!!!!!!!!!
I had been digging my heels in a bit making the transfer from crib to bed.  Part of it had to do with not wanting to admit my little guy is not so much of a baby anymore.  But mostly, I wasn't sure how the transition would go....would he be out of his bed a million times in one night?  Would he be up at 5:30 in the morning staring at me from the side of my bed asking for breakfast?  Things are good in a crib...you put 'em in there and there they stay! Life is easy like that.  But, it was time.  PLUS, I had all these fun new things for his new room!  For starters, we painted the room blue as it had been RED....like crayon red.  The previous owners used this room for their office and it worked for that, not a little boys room.  So, I painted it blue and made the construction theme duvet cover and curtains.  The stuffed fabric, Smile, above his bed was in my room when I was a little girl. 
I made the duvet cover with the trucks for the top, and the underside is a soft flannel.  I put snaps in at the bottom of the duvet for easy washing and also attached snaps to the inside corners of the duvet and also to the comforter itself so it doesn't shift.  Snaps seem pretty easy to match up so I'm pretty pleased with how that turned out.
 The curtains are just sewn with finished edges and the hardware was from IKEA.  Super easy.
And now he gets to have big brother read him stories at night!
 And how is the transition???  Going well!  The first night he didn't make a peep.  Nap the 2nd day was no big thing as he was so tired.  But the 2nd night he was out a bunch of times....he'd peek out his door, then tiptoe to Dot's room.  I'd walk him back and he'd get back in bed.  Finally when he peeked out his door and saw me standing right there, that seemed to do the trick.  Each nap is getting easier and bedtime went really well tonight.  He seems happy enough as long as he can have some books in bed to read to Roger, his teddy bear.  And we haven't had any early birds....yet!

Tuesday, March 26, 2013

Farmor's Weaving

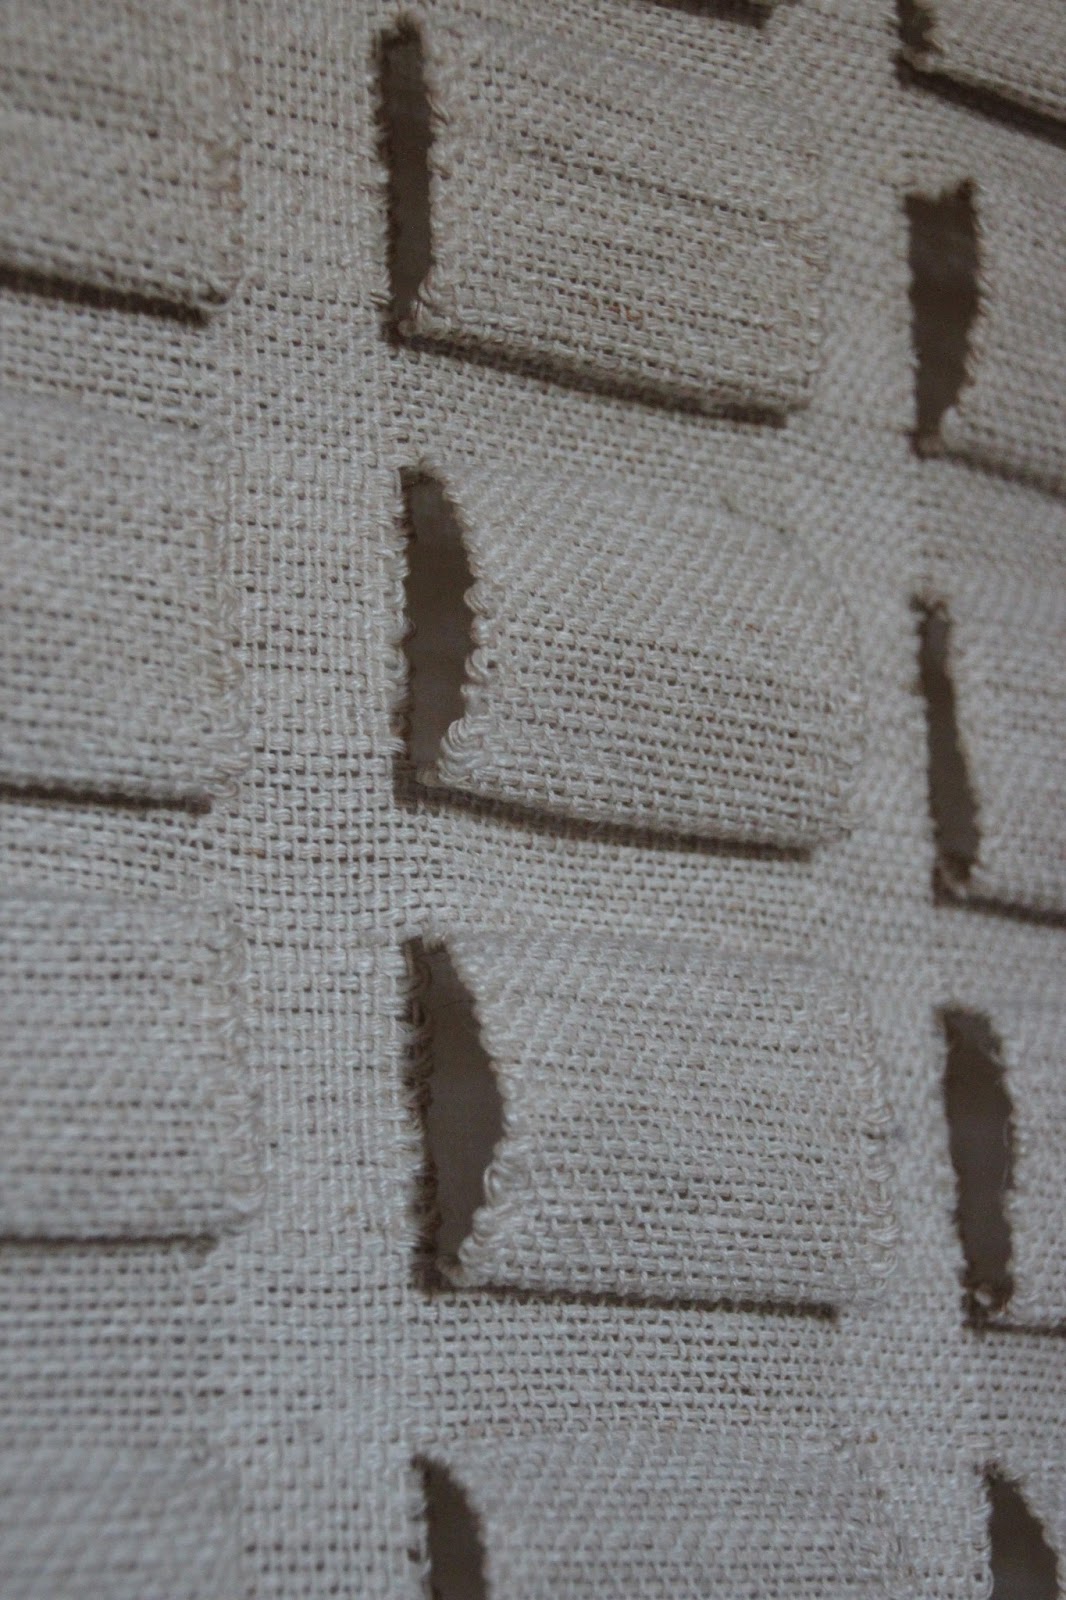
My Farmor in Sweden was an extremely talented textile artist.  She goes beyond the title of "weaver" when you see some of the things she created.  I sure wish I could ask her how she did things or to see her in action weaving.  One piece in particular is this tapestry that hangs in my cousins house.  My Dad sent me these pix and there has been much discussion, examination, and head scratching trying to figure out how exactly she made this.
You see, the yarn that runs up and down are the warp strings, they are the ones that go thru the loom.  The yarn running left to right are the weft that you shuttle back and forth on the warp.  So, there are these little "loops" that stick out from the main fabric.  The big question is how did she get them to stick out without ruining the tension of the rest of the warp strings?
It's clear to me that she had a separate bobbin or shuttle for each "bump" section and she wove more passes of weft on each of these "bumps"....but how did she release more warp strings without disrupting the rest of the main fabric?
Well, here's my take on it.  I was done with my sampler project and figured I would mess around with it before I cut it off the loom.  I believe that she hooked up those "bump" sections of warp string and wound them on the back beam of a 2nd loom...like she put two looms back to back and dressed one loom the normal way, but then took those sections of warp and used the wrapping back beam on a 2nd loom.  Since I don't have a 2nd loom, I had to weigh down those "bump" rows to create surface tension that matched the rest of the warp....so I very poorly wrapped my 3 "bump" sections around a 5 pound weight and hung it down the back of the loom.  I also didn't count for equal spacing...just kind of divided the warp strings into somewhat equal parts.
I made a bunch of bobbins and worked across to create the "pockets".  The weight didn't provide the best tension so it was really tricky to keep the warp where I need it to be and I encountered some "waving" of the fabric as it pulled differently so I place a wooden stick in the loops to help give it some structure when I started with main fabric weave after the "bumps".
 So, here are my pocket "bumps"...while very rough and obviously poorly constructed, I think I figured out how she did that tapestry and that's pretty much all I wanted to do was to figure it out.  And as you can see...once I did that....that was enough for me!  Haha!  It blows my mind that she made the huge tapestry. It is a treasure for sure!  


Tuesday, March 12, 2013

Loom Warping 101

I took a weekend weaving class a few weeks ago and since then I've been busy getting mine up and running.  The first thing I needed, that I didn't have, was a warping board.  I looked at some online but was turned away at the $150+ price tag for a few pieces of wood and some dowels.  So, of to Home Depot I went to get the supplies to make my own.  That's right...I spent a weekend with power tools!
I got 2 - 6' boards of oak to make the frame and 4-3' dowels for the pegs.  A little measuring, some sawing, some drilling, sanding, pounding and there you have it!  A warping board for around $30!
Worked pretty well!

The warping board keeps the warp organized, prepped for the loom and measures each strand the perfect length.  Once it's all done, you take it off and loop it in a chain like this until you are ready to put it on the loom.
Love that he is so interested in the loom and ready to help.
 Attaching the warp.
 These are the heddles.  They hold each warp strand through an eye in the middle of the heddle.  Each heddle is attached to one of the shafts that raise up and down which ultimately helps make the pattern.  This takes a long time to get just right.
 Once they are all through, you get to attach the ends and tighten up the warp....
 and finally get weaving!
 So fun! This is just a sampler to get a feel for different patterns and designs that can be done.  It's been fun, but now ready to finish sampler and move on to my first real project.....a scarf!  

Sunday, February 24, 2013

Weaving Weekend

I had an awesome weekend at my floor loom weaving class.  19 hours of crash course weaving!  I learned how to prep the warp on the warping board (seen below) and attach to the loom.  I had never done this step before and it's a little crazy, but totally fun.

Once you get the loom dressed, you get to start the weaving...the really fun part!  Since this was a class, they gave us two patterns to choose from, neither of which I was in love with, but hey, we're learning the process here and that was the most important thing.

The warp strings are the purple and gold, with the weft for weaving a burgundy/wine color.

The next three pix don't show the colors right...the top ones are more accurate, but I'm taking these at night in crappy lighting because I'm too excited to wait til morning.  :-)
 I haven't decided what to do with the fringe yet.
 And see that pretty wood bowl and candle holders?  Made by my Dad!  Looks good, huh?
 So, now I'm ready to tackle a project on my own loom.  Will keep you posted!

Monday, February 11, 2013

Grandpa's Paintings

I have a few of my Grandpa's paintings and they are beyond special to me.  I also have his easel which brings me more joy than you could possibly imagine.  I was only four years old when my Grandpa passed away so I never really got to know him.  I remember him from our visits to Minnesota in the summer and from their trip out to Virginia to visit us.  I remember him being so funny -- singing Christmas songs and mixing up all the words - I remember laughing and laughing.  He liked to take have his apples peeled, so of course I wanted the same thing.  I remember Grandma scolding him for drinking the milk right out of his cereal bowl instead of using a spoon...
and him giving us a wink and smile as he did it some more when she walked away.  
He loved to paint.  He taught himself and painted what he knew...the outdoors, nature.  
There is something special about a piece painted by someone you know and love....each brush stroke captures a feeling, a thought, a moment in time.  And what's really cool, is talking about his paintings and looking at them with my daughter...she inherited his talent and I think he would be proud.
Anyway, some of the paintings are in frames that are a little dated...
like this one painted in 1971.  
Framing art is ridiculously expensive and so, for now, I decided to try to revamp this frame using a little paint. I'm being thrifty and creative....I'm sure Grandpa wouldn't mind.
So the frame went from this....
To this....

I wanted to use the blues and grays in the background and the rocks for the frame.  I decided to spray paint it using Rustoleum's Slate Blue.  Then I used some metallic gold to fill in the details.  I simply used a paper towel to rub the gold on, then another to wipe it away.  The gold gives it a little warmth with the oranges and golds in the foreground.  I'm really happy with it...and it looks smashing in my art room! 

Then there is this one, Winter Farm - 1978.  This painting was featured in a Duluth calendar in 1978.  My Great Auntie, his sister, was also featured in that same calendar.  Cool, huh?  I love the blues in this one.  The frame is also dated, but I like it better than the previous one.  It seems to fit the painting...but an update could work, just not sure how...any ideas?