Saturday, April 21, 2012

Spring Flowers

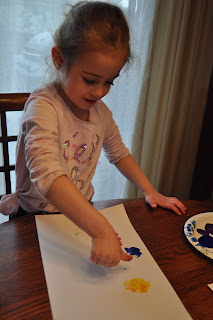
 Last week the girls and I did a little finger painting and made these cute spring flowers.  They loved getting their fingers in the paint and using their thumbs to make the flower petals.  I had to chuckle at how differently each girl approached the flowers. 
Dot was very precise in making her petals....working hard to keep them round, with white centers with a splash of color on top of the white.
 L was a little more free with her flower making and seemed to like hers larger and didn't mind if the petals weren't touching each other.
 They both liked finger painting the stems in.  
Isn't that beautiful?!  Put that in a frame and WOW!  Great job, L!
 So serious!
 Dot decided to make her stems shorter and a few with leaves.  
Love it!
And yesterday was a beautiful day so we spent a ton of time outside.  Dot really likes mermaids lately so we took her Ariel bathtub doll, some ponies and some pretend lizards (hey, why not?) outside to play in a bucket of warm water.  We put some landscape rocks in there too to make it more ocean-like.  They played here forever and it was such fun to listen to their little conversations.


Tuesday, April 3, 2012

Bunny Hand Prints

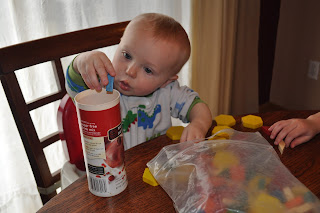
 I typically plan craft time during nap time for Nikkels, but today I thought he may be old enough to participate without taking away too much of this creative time for Dot.  He did GREAT!  The trick is to have enough activities to entertain him at the table during the down times and he loved it all.  For starters...this kid loves shapes and containers....put them in, dump them out, and repeat.
So, the hand prints.  I had seen something similar about the bunny hand print but I didn't like how the ears looked, so this is what I did....
Use a paintbrush and paint hand, skip the thumb.
 Then print on paper.....I didn't photo the next step as I had to help the kids create the "vulcan" or "Mork" symbol...kind of tough thing for a 1 and 4 year old.  When the print was dry, they made a pink thumb print for the nose, glued on googly-eyes and with a marker drew on the whiskers and mouth.  Done!
 Well....being the little artist that she is, Dot felt her bunny needed a body.  So she took some of the left over paint and finger painted the body on and glued on a cotton ball for a tail.  Then we bubble cut each bunny......NOW.....it's done!
For a side activity I got out the watercolor paints and let the kids paint on coffee filters.  You wouldn't believe the amazing things you can make with painted coffee filters.  More on that another day.  Nikkels really enjoyed painting.  He did need a few reminders not to eat the brush, but he did really well!
The paint dobbers are a huge hit too!
And check out this cute little picture Dot drew the other week.  Isn't it just adorable?  I'm kind of blown away by the puppy....I mean, she just turned 4 years old!  So fun!

Sunday, March 4, 2012

Shamrock Chocolates

 The girls and I made some pretzel chocolate treats on Friday....the plan was to make them look like little shamrocks!  I'm not exactly sure if we succeeded with that...but they sure were yummy!
We knew we need 3 M&M's for each treat, so we counted out all our green M&M's (yup, we had to sort them from the rest of the bag) and we ended up with enough for 27 treats!  Together we counted out 27 pretzels and 27 Kisses.  The girls unwrapped the the candy and put them on the pretzels.  In the oven they went for about 5 minutes at 200 degrees.
Then we pressed 3 M&M's into the chocolate.
 To speed up the chilling process, we just stuck them outside in the snow.  It didn't take too long, but for a four year old, it was kind of like watching paint dry.
 The real kicker in having these look like real shamrocks, was to use a little green line of frosting for the stem...but honestly, I was just too cheap to spend the 2.50 at the store for a tube of green frosting for a silly little treat.  But can you picture it now? Fun, huh?  And pretty yummy too!

Thursday, March 1, 2012

Special Delivery

 Dot has been making all kinds of notes and pictures, wrapping them up in some construction paper and delivering them to us.  It doesn't matter where we are....we could be in the kitchen, living room, laundry room, and she'll make a little "peep" sound and disappear.  We are now trained to look inside the crumpled paper to find our treasure.  Since she enjoys playing "mail" so much, we decided to make some envelopes for her special deliveries. 
Pretty simple...we took some 8x10 sheets of felt, folded and glued the sides, cut the edge for the flap just a bit.  I thought about sewing the edges, which would look pretty cute, but lugging out the sewing machine just seemed like a big task, so we'll see how the glue holds up.  I cut some small squares of white felt so she could decorate her "stamps".  She also wrote her name for her "return labels".  She did all of the gluing and deciding where everything should go, but I did most of the cutting.  For the recipient we used some paper we cut out of her reusable wipe away coloring books.  Now she can write with her dry erase marker and change the name of the recipient.
 The back of the envelopes needed help staying closed so we added on a button to secure 
the treasure inside.  Dot loves this part!  All evening we have been getting 
very "special deliveries" in their new envelopes. 

Thursday, February 16, 2012

Cleaning Green

Okay, so this post has absolutely nothing to do with crafts or kids but it's going to be about cleaning.  If cleaning is of no interest to you...move right along!  What I am going to share with you excites me to no end as I have found cleaning supplies that are WAY cheap, easy to use and work great and not harmful on the environment.
First, Drain Cleaner.  Man....that is just some plain nasty stuff (both the chemicals and the stuff that's stuck).  We had a rather slow drain in the kids' bathroom....while we stress over and over the importance of using just a "pea-size" amount of toothpaste, I'm pretty sure we have more of the "peanut M&M" size going down.  Anyway, I went about taking the drain stopper out and looking for the sludge and clog....got some out, but it was still slow.  So, after hearing great reviews, I decided to try the simple recipe of 1/2 cup vinegar and 1/2 cup baking soda to unclog the drain.  It was SO cool!  The second those two touched, it bubbled and fizzled and the sludge and slim just peeled off the pipes and "melted" away.  I let it sit for a few minutes and then just ran really hot water through...Hooray!

I've also tried my own dishwasher detergent.  It never occurred to me to make my own detergents....that is until the power of Pinterest.  I have learned that Borax, Baking Soda, Washing Soda, Fels Naptha are huge cleaning agents in many cleaners and WAY cheaper than the pre-made kind.  After doing some research, I decided I'm not totally ready to completely dump the idea of pre-made detergents....i just don't need to use ALL of it.  So, I made a mix of 1/3 Cascade, 1/3 Borax and 1/3 Baking Soda (I've read that Washing Soda will work just as well).  Mix it all together and use 1 tbsp for softer water and if you have really hard water then 2 tbsp may be necessary.  Anyway, I've been using it in my machine and it works GREAT!  Detergent lasts WAY longer and dishes are just as clean.

I haven't done this yet, but I will be tossing out my JetDry once it's all used up and will then start putting in straight vinegar in the spot rinse container in my machine.  Have read great things about that too.

I'm really toying with the idea of making my own laundry detergent too.  Basically a mix of Fels Naptha, Borax and Washing Soda.....it makes a ton and pennies to make compared to the big brands.  I'm still researching to see how I want to handle that as there are different "recipes" and such...and making sure it's safe for HE washers.

So, there you have it.  A post about cleaning.  How much more exciting does it really get???

Friday, February 10, 2012

Butterfly Hearts

 We were feeling the need for some pink today with Valentine's Day just around the corner.  The girls were very excited to get out the paints and they had a lot of fun making their heart prints.  We just used some cookie cutters to make our prints and they worked really well using them upside down to get the thicker lines.  They also thought mixing the red and white to make new pinks was pretty cool.
 We really didn't have a plan at first.  Printing the hearts was just plain fun, but then I started cutting out some larger hearts for them to print on.  That's when we noticed they looked like butterfly wings........HEY!  Let's turn one into a butterfly!  Love these kinds of projects where the kids take charge and come up with some really cool ideas. 

 So, we started digging through the craft cupboard and this is what we came up with!  Paint dotters, heart and x and o prints, gemstones, sparkly antennas, pom-poms, googly-eyes and little hot glue get you these cute little heart butterflies.   

Friday, January 13, 2012

Cloud Dough

Dot and L had a great time playing with Cloud Dough today.  It's such a silly thing really, but they played in it for almost an hour and just loved it!  Two ingredients is all you need...flour and oil.  Any oil would work, like vegetable oil and such, but I used baby oil because it smells so good.  We did 8 cups flour and 1 1/4 cup oil.  Mix together and play!